agait e-clean vacuum cleaner (mini)

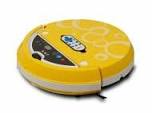
Around The HomeASUS hoping to clean up with robotic E-Cleaner4 picturesThe E-Cleaner features a sanitizing UV lamp which complements the cleaning power of the vacuumASUS subsidiary AGAiT Technology is the latest to have a bash at realizing the dream of robots performing domestic tasks with the EC01 E-Cleaner robotic vacuum cleaner. As well as offering similar cleaning functionality to that of its rivals, the EC01 also benefits from a sanitizing UV lamp which disinfects as the unit vacuums.The E-Cleaner travels around a dirty room in up to five pre-programmed cleaning patterns at between 16.5 and 18.5 cm per second and providing said room is of 4.8m x 3.2m proportions, it is claimed that it will complete its task in some 30 minutes. As the unit vacuums up the dust and dirt, an extra level of cleanliness is afforded by the onboard sanitizing UV lamp (which is claimed to be good for 6000 hours of use). Should it come frighteningly near to the top of a flight of stairs, its dramatically named cliff sensor will help ensure that it won't come a cropper.

The 14.4V Ni-MH rechargeable battery will recharge in three hours which will provide enough power for 90 minutes of cleaning. And to lessen the chance of misplacement, AGAiT has included a place in the upper cover for storage of the remote control.
dog vacuum cleaner youtubeAccording to Taiwan Economic News, the E-Cleaner will be made available shortly to households in China and Taiwan for less than NT$5,000 (about US$154), cheaper than the recently announced Neato and the established Roomba.
shark vacuum cleaner canister Joined: May 25, 2005, 11:12 am
upright vacuum cleaners for pet hair Joined: Apr 29, 2005, 9:13 pm The thread Urnex Grindz Espresso Grinder Cleaner offers opinions on the subject, including the usage of rice instead of Grindz.

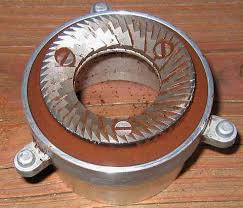
I've heard the same advice as your repair firm's, probably because they worry the owner will cross-thread the burr carrier. The rice-once-a-month routine satisfies most of my neatnik urges; I'll remove the burr carrier for inspection once or twice a year. At least for the Mazzer, the difference between one week and six months of trapped buildup isn't readily apparent - what the rice (or Grindz) doesn't get is redeposited post-haste.According to the owner's manual, the Mini's burrs are good for 300 kilograms of coffee. When the day comes to change them, it's a 10 minute operation. The tricky part is the upper fixed burr assembly "floats" on three stiff springs. These springs push the upper aluminum cast assembly against the chromed steel collar. That tension is good for keeping the setting firmly against the top of the threads (no slop) and prevents the collar from moving, but means you have to push against three springs to rethread the collar. Some owner's cross-thread, especially if they have trouble finding the first thread's engagement point or forget that it is reverse-threaded (counter-clockwise is tighter).
Hint: If you mark the disengagement point on the collar with a felt-tip pen, it will be easier to rethread later (i.e., to rethread, set the collar gently on top of the threaded chamber, turn it past the point of engagement until it "drops" into the first thread, then reverse to engage the threads). Again the tricky part is holding the floating burr assembly down far enough to allow you to engage the threads while they are not under tension (you could drop a tamper into the throat of the grinder and ask a second person to push down firmly).My grinder hasn't been opened up in awhile. Tomorrow I'll take some before/after pictures after a Grindz treatment, then you can decide for yourself it it's worth the trouble. I will also snap some pictures of the disassembly / reassembly. You may want to avert your eyes, this isn't pretty. I've been slacking off lately on my grinder maintenance, as you can see from the buildup on the upper burrs:The grinds adhered to the upper burr's sides, forming a rounded corner of old coffee.

The lower burrs fared better, except for the three agitator / ejector vanes, which accumulated a thick smudge of grinds. Let's see what Urnex Grindz can make of this mess:Not surprisingly, what was caked on stayed put. The other surfaces are shiny and lighter without any evidence of oil buildup; if Grindz is to be effective, looks like you need to use it frequently enough that coffee grinds don't get a foothold. Now that we've seen the quick-and-easy approach, let's review the old-fashioned way, starting with how to remove the burrs.Empty the hopper, run the grinder until the chamber is empty. Set the hopper aside. Don't just turn it off at the switch, .Remove the safety limiter Phillips screw from the chrome-plated collar. Its removal allows the collar to spin freely.Turn the collar clockwise to remove (it's reverse threaded). Carefully mark the collar at the point the threads disengage with a felt-tip pen for later reference.Clean the burrs with the implements of your choice. I use a small stiff bristle brush, vacuum cleaner, toothpicks, chopsticks, and for the really teenie cracks, a sewing needle.

Apply no oils or introduce water into the grinding chamber, and obviously no chemicals of any sort.As I mentioned earlier, screwing the collar back on can prove challenging because you must push down the upper burr carrier against three tension springs while engaging the threads. You can do it yourself by pushing the aluminum carrier down with the flat of your hand while rotating the collar with your other hand, but I recommend getting a helper:Place the upper burr carrier and collar in position. The mark noting the disengagement point should be an inch or so prior to the start of the thread (i.e., the dot on the collar should be to the right of the engagement point).Place a tamper into the throat of the grinder. Ask your helper to push down. It won't require a lot of force, compressing the springs a few millimeters is enough.Rotate the collar clockwise (remember, it's reverse threaded, this is in the looser direction). The thread of the collar should nicely drop into the thread of the lower assembly.

Continue turning just a little further, then reverse to engage the first thread.Remember to put back the safety limiter screw. The threads engage easily. If you feel resistance, rotate the collar clockwise to remove and try again. Take your time, cross-threading the collar would be a costly mistake! Joined: Oct 31, 2005, 4:05 pm ) are amazingly useful for this task. I have Duluth's set with the case and tweezers. It's come in handy for everything from working on my motorcycle to refinishing fine furniture and is a real frustration saver. Looking at my "before" photos, it's really inexcusable. If you've fallen behind on your grinder cleaning regime like I did, here's another motivation to mark the calendar each month: I noticed that since cleaning the grinder's chamber, my extractions are more even. The vanes not only eject the grinds out the chute, but agitate / remix the grinds beforehand for even less clumping; I can see an extra "fluffiness" in the grind too that was lacking lately.
The owner's manual (of course) doesn't recommend how often the chamber should be cleaned. How often does a good cafe do it? Joined: May 09, 2005, 12:25 am Just wondering why it's necessary to "carefully mark the collar"....I've got a mark on the collar where my burrs touch...i've removed the upper, cleaned out the lower section and using your push down method, replaced the upper section, being careful to avoid cross threading....everytime, I hit my burr touch mark exactly...not even one notch off...seems like if threading is performed correctly, a mark for thread disengagement would be unnecessary...but if I'm wrong..... Agreed, it's only a hint. I offered (overly)cautious guidelines because cross-threading the collar would be a costly mistake. Since I started this thread allow me to add that Dan is keenly (kehnly?) aware that we who read these posts have a wide range of skills. Mine are clearly not on the technical / machine side of the spectrum. Accordingly I welcome all these simple (simplistic to many) comments.