ceiling vacuum cleaner hire

How do I cover small hole made by thumb tacks in house walls that are painted white?What's the best way to cover up fake wood paneling? I've used wall liner (it applies like wallpaper only thicker) to cover a multitude of "wall sins" over the years. In my opinion it's the greatest thing since sliced bread. It doesn't look cheap or tacky, it's inexpensive, non-labor intensive and not messy to install.I used it for the first time about 15 years ago to cover a faux brick tile on my lower kitchen walls that couldn't be removed. It was either tear the wall down or take a chance on $40 worth of wall liner. It did the job beautifully and lasted. Since then I've used it to cover paneling, a badly gouged wall after a kitchen remodel and a wall that looked like a pegboard after floor to ceiling shelving was removed.Friends and family (and realtors!) have been amazed by the transformation after applying this simple inexpensive product.How much does it cost to remove 2200 sq feet of popcorn ceiling?
Remember, you not only have to remove the popcorn texture, but also redo the ceiling in some other texture. Price will depend on several factors: 1) how much the contractor you choose hates removing popcorn or textured ceilings - some charge $1 or so/SF extra just because they hate it. There are even some who bid total drywall replacement cheaper than removing the popcorn, so you have to first find contractors who are happy to do that work, or your prices will be out of the realistic range 2) if the popcorn predates about 1990, then it could likely have asbestos in it, which doubles or triples the price, and in many cases uncapsulating it with a spray coating and then removing the drywall entirely is actually cheaper than all the protective measures necessary if it is scraped off. 3) whether the popcorn is primarily gypsum and vermiculite (comes off REAL easy) or was the plaster of paris variety, which takes a fair amount of soaking to soften it enough to scrape off
4) what type of finish you are replacing it with - if a textured ceiling, slapcoat, knockdown finish or paneling, not real problem. If you want to go with a perfectly smooth ceiling (generally a bad idea as any variations in the drywall on a ceiling surface really shows up dramatically), then it will demand a lot of care in preparing the scraped surface, and a complete surface drywall compound skim coat to smooth out the scrapes and gouges from the removal process.
vacuum cleaner motor price in india 5) what underlying conditions are - if there is a lot of furniture to move around (should go to adjacent rooms) or cover and work around, high-quality rug or hardwood floor to super-protect or such, will drive cost up.
sears vacuum cleaner promo code I have seen costs run from as low as $0.60/SF to $1.25/SF (for removal only).
dyson vacuum cleaners stick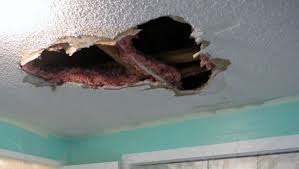
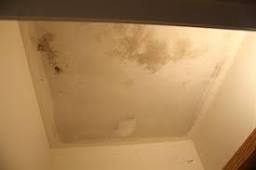
Generally, remove and recoat with a surface texture of some kind (anything but smooth) and paint will run you about $2.50-3.50/SF. Now the bad news - if asbestos containing, can run from $5-10/SF. Many homeowners in that situation go the other legal route - have it encapsulated with an asbestos-rated sealant by an asbestos contractor, then paint it and leave it for the next homeowner to decide what to do about it. Some contractors encapsulate it and then put a 1/4" thick drywall layer over it - this usually looks like a disaster unless it has a VERY rough textured finish on it, because putting drywall sheet over a rough surface like popcorn invariably means a wavy surface commonly looks like a gently rolling ocean surface.It all started with a great big hole in the ceiling caused by a drain line back up in the central air conditioning system. Luckily, the damage was covered by the AC warranty. So I didn’t have to roll up my sleeves for that one. But I still did write up a step by step tutorial on how to repair a hole in your ceiling drywall.

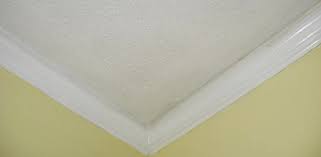
I did hate the existing popcorn ceiling. So it seemed kind of silly to cover the repaired drywall with more popcorn. The repair guy was only going to charge me about $100 over what the warranty was paying for the repair to remove the popcorn, so I figured why not have him do it. Then I could learn from the professional what the best way is to remove the popcorn ceiling before I take on any of the other rooms. I’m really glad I did that. Removing the popcorn surprisingly brightens up the room. All those little popcorn nodules create little shadows on the ceiling, making the ceiling and the room look darker than it really is. Now the room has a much cleaner, brighter look to it. I do recommend that if your home was build before the 80’s, have the popcorn checked for asbestos before tackling the job. You can actually purchase an asbestos testing kit right HERE on Amazon. If your ceiling contains asbestos, it’s best to have a professional asbestos removal service handle the job.

Better safe than sorry. Anyway, there are three things you’ll need to make this job quick and easy: So, let’s get on with the tutorial… Removing popcorn ceilings can make a heck of a mess! But my repair guy had that totally covered to where there wasn’t a spec of dust left when he was done. And I didn’t even have to remove any furniture from the room! Step 1 ) My repair guy started by covering all the walls and the floor with the pre-taped plastic sheeting. I had never heard of the stuff, but I was completely blown away by it. Perhaps I’m a little slow, but I never would have thought to cover the walls with plastic. But it was brilliant because it took him all of five minutes to put the plastic up and less than that to roll it up at the end of the job, leaving behind a perfectly clean room. Even the window ledges were clean. You can see where the taped edge is along the ceiling. Then you just drape the stuff down and all your furniture is covered.
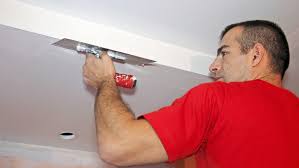
This is soooo much easier than taking apart a bed and moving all the furniture out. Step 2) Once you get your plastic up, you need to wet the ceiling. To do this, my repair guy actually used a bug sprayer filled with water. His sprayer was backpack-style, but you can use any kind of sprayer. And it’s way easier than trying to sponge down your ceiling. Plus, since your entire room is already covered in plastic, there’s no need to worry about getting anything else wet with the sprayer. Spray the entire ceiling then go back to your starting place and you can start removing the popcorn. Step 3) My repair guy used a 6″ putty knife to remove the popcorn. Here’s his fast-motion picture… To remove the popcorn, glide your putty knife across the surface moving slowly with long strokes in one direction. This will help prevent the corners of the knife from digging in and gouging the drywall. So let me emphasize: If you want to avoid gouging the drywall, use LONG, SLOW, EVEN STROKES.
No short back and forth strokes. The popcorn easily peels right off. No need to power into it. With these long and even strokes my guy removed all the popcorn in less than 30 minutes with zero gouges in the drywall. If you do get any gouges, just use your putty knife to apply a little spackle or joint compound and smooth it out. Step 4: At this point if you want to put a light texture on your ceiling you can. Step 5: Then use a quality primer to prime the ceiling before painting. You’ll get the best coverage with an oil-based primer, which is what my repair guy used. The downside though of oil-based paints is that they stink. I mean really stink. I literally had to keep the room’s windows open and door closed with a towel stuff under it for several days so that the smell didn’t fill the rest of the house. Had I not seen it with my own eyes, I wouldn’t have believed it was possible to clear that entire ceiling in 30 minutes. I am pretty happy with the final result!

No more popcorn ceilings thank you very much! So remember, to make this project as easy as possible: 1) Use plastic sheeting not just on the floor, but on the walls too. 2) Use a sprayer to wet the ceiling. 3) Long, slow, even strokes with your putty knife. And a few other tips… Consider wearing a dust mask. Dust will be minimal since the material you’re peeling off is wet, but a dust mask couldn’t hurt. Also, before taking on your popcorn ceilings, make sure your ceilings do not contain asbestos. Most homes built after 1978 do not contain asbestos. But if yours does, I do recommend having a professional remove it. There you have it. You’re now on your way to beautiful ceilings. Next, don’t forget to check out The Ultimate Cool Holiday Gift Guide… And for more fun ideas, check out… Don’t forget to sign up for email alerts so you never miss a fun DIY! It’s free and you can unsubscribe at any time! This post linked to some of these totally fabulous blogs and here.