diy vacuum record cleaner

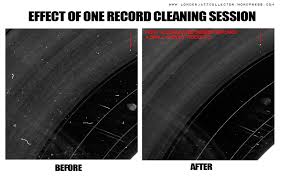
Now you can go clean some vinyl!Thanks for checking all of this out, I believe that we have come up with a great vinyl cleaning system that is sensible and doesn't break the bank. .If you have a unique build or a question please contact me! I love to help out and I want you to be really happy with the RCM you have created.I grew up listening to records and over that entire time I've never had a greater improvement to my listening experience. Please come to our shop with a few dirty records and you will leave smiling. Attach whatever you think is safe to both sides of the wand to protect the record. We have been using the "loop" side of self-adhesive Velcro with fantastic results and zero record marring. Once you are satsified with the rotation, the easy stuff starts. Using that same record as a template, cut out a 12" circle of high friction padding. Mark and cut the center-hole and install on the platter. For the best performance we suggest cutting the pad back so that the record is fully supported and not just resting on the outer edge.

We use an old turntable mat to trace around it. Drive a #6 pan head screw through the hole. Rotate the platter a 1/2 turn, pre-drill and drive another screw. Now that it's fixed go ahead and rotate it with the record and puck in place to check for clearance. If you are happy, rotate, pre-drill and add a couple more screws. Now is the time to tighten things up. Remove the record without disturbing the platter's location and pre-drill a clearance hole for a #6 screw. The only important thing is that the wand clears the puck weight. You are looking for about 1/8"-1/4" clearance. This is the part people always ask about. Go ahead and insert the wand into an elbow and place a sacraficial vinyl onto the spindle of the platter. You can now easily get an idea of how things line up. If you are using the platter we are using, remove those pesky friction dots. Reassemble the platter and stick the spindle in the center of the platter. The 2X tape is already appiled to the spindle. You can use an old record to make sure it's completely lined up.

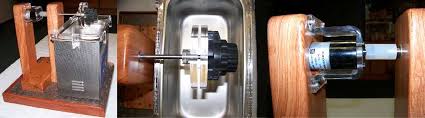
We recommend opening the platter and lubing the bearings. After all, this is a $10 platter. Drill a hole only through one half of the platter. It needs to be big enough to slide a screwdriver shaft through. Screw or glue it (or both or neither) if you desire. Cut around a 2" section of PVC pipe for the vac adaptor.
hand vacuum cleaner sri lankaThis fits most vac hoses as it has tapered surfaces both inside and outside for a friction fit.
rainbow vacuum cleaner fragrancesInsert the "Tuning-Port" into the elbow and slide on and screw down the pipe support leaving at least 1" exposed pipe if you plan to change direction with another PVC elbow.
vacuum cleaner parts sun city azAnother Fliparoo for the plinth. You are again looking at the bottom side.

Slide a 90 degree elbow (Lee Valley PN EA285 ) over the exposed pipe and point it towards the direction you would like to attach your vac hose. You can then pre-drill and drive a #6 x 1/2" pan head screw or glue it in place with PVC cement (but neither is nessary) Insert this pipe until 1" is exposed on the upper side of the plinth. It may be a tight fit but this is a good thing. Cut a piece of 1" PVC conduit approximately 3-3/8" long. You can then flip the plinth back over and install the vac-sleeve with #6 -1/2" pan-head screws. Orientation is not important. We cover the bottom of our feet with high friction pads. We use Lee Valley PN 88K59.05 (one roll will give you enough for the entire machine and it's really handy stuff) Flip the plinth over and attach whatever legs you have decided to go with. This can be as simple as a couple of 2x4"s We use Lee Valley PN 00S85.01 First step is to drill a 1-1/2"inch through hole 3" from your chosen side and 2-5/8" from the back of the plinth.
Step one: Choose your plinth. We like to use 7/16" veneer-core plywood because it's relatively cheap, water resistant and it takes a finish very well. We have found a 15" x 15" plinth is ideal. It is generous without being oversized and stores well.You can use anything you want. You can build it into a platform, an old turntable or into a cabinet. This is the platter we use. Around $10 Lee Valley PN 12K64.12 These are the parts WE use, There are many other options. About $40 These are the parts included in our kit. description of a record cleaning machine I built. It uses an industrial wet vacuum cleaner with 1000W to suck the cleaning fluid from theThe fluid is applied by swinging a tube over the record and pumping with a manual pump. The platter is rotated manually and a normal paint brush can be used to get the dirt out of the grooves. professional brush from a Moth record cleaning machine. sucking tube is swinged onto the record (please don't forget to glue the
velvet onto the tube, or the first record you cleaned is cleaned to death) and the vacuum cleaner is switched on. One or two spins should be enough to suck all the fluid with the dirt away. Above is a top view of the recordThe plinth is a box which is about 10cm high. MDF because it is good if the whole thing is rather heavy, so that the machine does not move while vacuuming. The vacuum is rather high as the air slit is very small compared to a cleaning tube of a vacuum cleaner. View From Underside theEven though vinyl has regained a little market traction in recent years, the accessory business hasn't. If you're a collector who enjoys digging through crates of old and scratched LPs, you've probably found some dirty ones in need of cleaning, and Instructables user bfk has a simple and cheap solution. You'll need to build a small wood block with a strip of plastic attached, but the crux of the cleaning comes from removable putty wrapped around a small bar.