vacuum cleaner belt broke
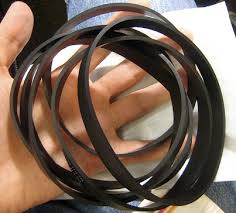
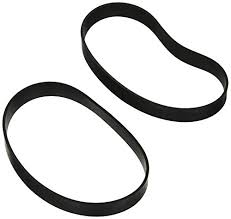
Dirt Devil Replacement Vacuum Cleaner Belt Part Number 3860140600 (2 Belts) 6 x 5 x 1 inches #830 in Appliances (See top 100) #216 in Home & Kitchen > Vacuums & Floor Care > Vacuum Parts & Accessories > Replacement Batteries & Parts > Belts Dirt Devil Style 10 Vacuum Belt Royal Style 10 Belt (RY6100 Commercial Bagless)# 1-860140-600 See all 23 customer reviews (newest first) OEM replacements, works fine. I was very pleased in how fast I received the product. This product arrived very promptly and is exactly as described. It fits my vacuum cleaner and works perfectly. style 10 belts worked perfectly! Product is perfect fit My vacuum cleaner belt broke so I checked the stores and it was impossible to find. The belt came within a week and my vacuum is up and running. Hoover Elite Vacuum Cleaner Belt 3/pack 38528-040 7.5 x 3.9 x 1.7 inches #11,485 in Home and Kitchen (See Top 100 in Home and Kitchen) #22 in Home & Kitchen > Vacuums & Floor Care > Vacuum Parts & Accessories > Replacement Batteries & Parts > Belts

5 star74%4 star13%3 star5%2 star1%1 star7%See all 149 customer reviewsTop Customer ReviewsDifficult to put on, but seems durableGood price and pretty decent quality consideringHoover Vacuum Belts - Just What I NeededI was convinced this was not the part it was ...you will probably be disappointed..Thought it was too small, but it works fine.Vacuum cleaner belt for my Hoover bagless vacuum cleanerThe design of the Dirt Devil Purpose for pets upright vacuum allows you to clean up pet hair from your carpet with the help of powerful suction and a motorized brushroll. The 12-amp motor creates the suction and its attached shaft spins the belt attached to the brushroll. The rotating brushroll helps move the pet hair up into the base of the vacuum, so the suction can capture it in the attached canister. A stretched or broken Dirt Devil vacuum belt reduces the vacuum’s cleaning power. Installing a new belt restores the vacuum’s effectiveness. Unplug the vacuum cleaner from the wall outlet.
Step on the handle release pedal above the vacuum’s left rear wheel. Lower the handle of the vacuum to the ground.
miele vacuum cleaner whirlpoolTurn the vacuum over to expose the underside of the vacuum’s base.
vacuum cleaner mini hargaRemove the three screws from the underside of the vacuum to release the nozzle and brush guard.
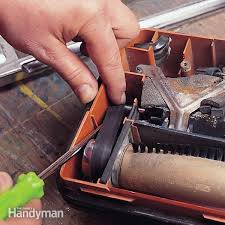
vacuum cleaner service and repair in puneYou can find two of the screws at the right and left side of the brush guard just behind the brush guard opening. You can locate the nozzle guard screw to the left side of the brush guard next to the vacuum’s rear wheel. Lift up on the nozzle guard and pull it toward the front of the vacuum. This also lifts the attached brush guard off the brush and the underside of the vacuum.
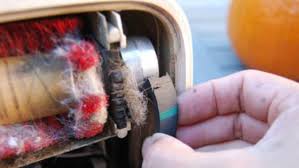
Grab the brushroll with your hand and lift it from the base of the vacuum. The belt attaches around the left end of the brushroll and the motor shaft next to the rear wheel. Pulling it from the vacuum releases the belt tension and allows the belt to slip from the end of the brushroll and the motor shaft. Discard the old belt. Slide the replacement belt over the motor shaft near the rear wheel of the vacuum. Insert the end of the brushroll into the belt. Make sure the belt rest in the gap between the bristles on the left end of the brushroll. Insert the brushroll back into the base of the vacuum. Make sure the flat end of the brushroll end caps face the ceiling. Manually rotate the brushroll toward the front of the vacuum to ensure the new belt aligns properly. Align the tabs on the front edge of the brush guard with the slots along the front of the vacuum. Lower the brush guard and the attached nozzle guard onto the body of the vacuum. Secure the nozzle and brush guard with the three screws you removed previously.

Turn the vacuum over and lift the handle to the upright position. Things You Will Need Screwdriver References Dirt Devil: Dirt Devil Owner’s Manual Suggest a CorrectionIf anything should suck, it's your vacuum cleaner. But if you don't properly maintain it, you'll shorten its life and find that it sucks a lot less than it did when you first unboxed it. Not only that, but if you have pets, not cleaning your vacuum often can intensify that pet odor and spread dander (not to mention, ruin your allergies even more) every time you vacuum. Here's how to deep clean your upright vacuum to keep it running like new. Start by emptying the dust chamber into the trash can. But don't put it back into the vacuum yet. While it's out, give it a nice wash in a sink full of warm, soapy water. Washing this tray likely won't improve its performance any, but since you'll need to take the vaccum apart anyhow, you might as well do this part. Before inserting the dust chamber back into the vacuum, if there is a grille on the inlet to the dust chamber or bag, make sure it's not obstructed by any debris.

Lay the vacuum on its backside and take a look underneath. The brush roll should be free of debris and roll freely with a small amount of tension from the drive belt. If this is covered in string, hair or something of the like, you need to remove the brush roll and clean it. You may need to consult your owner's manual (or the manufacturer's website) for instructions on how to remove the brush roll. Typically, it's held in place by a piece of plastic with a few quick release clips. Removing this guard will allow you to slide the brush roll out and remove the drive belt. Once its out, use scissors or a knife to carefully cut away anything that may be wound around it. Also check to make sure nothing is obstructing the hose opening to the rear of where the brush roll sits. Clear any obstructions before reinstalling the brush roll. Once everything is cleaned and free of debris, insert the brush roll back into its slot. First, slide the drive belt back into place. In most cases you will need to pay attention to the orientation of the brush roll, as it can only be inserted one way.
Replace the plastic cover and stand the vacuum back up. Next, take a look at the filter trays. If it's been a while since you replaced the filters, chances are, it's time to do it again. Filters for vacuum cleaners vary quite a bit in price, but replacing them should only set you back $10 (£7.54 or AU$13.24) to $30 (£22.61 or AU$39.72). Consult your manual or the manufacturer website for filter replacement part numbers and additional info on what type of filter your vacuum takes. You can stretch the life of a paper or fiber filters with plastic trim by removing them and giving them a good shake outside or over a trash can. You can also tap it on the rim of a trash can or use a can of compressed air to forcibly remove the dust. This will cause a mess and might trigger some sneezing, but the plastic will help keep the filter rigid while you remove much of the dust build-up. This also won't restore the filter to its original condition and it won't be as effective as a new one, but it will work in a pinch until you can replace it.

Some filters can simply be rinsed and reused. Often, this is noted on the filter itself (see above) or in the manual. A foam filter, for instance, can likely be rinsed and reinserted into the vacuum once dry. Just remove any excessive dust and debris by hand before running it under warm water. On the other hand, a HEPA filter needs to be replaced, since it's made of loosely connected fibers and will be far less effective after being introduced to water. If the suction of your vacuum isn't what it used to be, check the hoses. There are multiple points at which the hose could become disconnected: the intake of the motor, near the bottom of the vacuum where the hose routes to behind the brush roll and in-between if your vacuum has a hose attachments. Make sure all the joints are fully connected and sealed, as they can sometimes be jostled loose during use. And something as simple as a loose hose connection will make your vacuum ineffective and blow dust around rather than suck it up. While checking, take the time to look inside the hoses for clogs or build-up.

Larger items picked up by the vacuum can get lodged in a hose, which will negatively impact the power of the suction. You can use pipe cleaners or even your fingers to remove debris near the end of a hose. But if there is debris out of reach, you may be able to remove the hose altogether and shake the debris out. Also check for cuts or tears in the hose. The tear wouldn't have to be very large to have a noticeable impact on the performance of the vacuum, and this is less likely scenario. But it's worth checking yourself before contacting a service repair center. Turn the vacuum on and run your hand or even a piece of paper along any exposed hoses. If there is a cut or tear, you should feel or see a small amount of suction. If you've maintained your vacuum cleaner and it's still not performing as it should, you may want to consider contacting the manufacturer or a repair center to further diagnose the issue. In many cases, you can have a part replaced for far less than the cost of buying a new vacuum cleaner.