vacuum cleaner cord damage

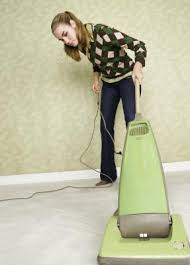
Show All ItemsReplace your vacuum's power cord with these simple repair steps, a smart way for vacuum owners to save time and money at the repair shop. Vacuum power cords can start to look like ominous fire hazards over time or a few accidental passes of the brush roller, and many vacuum owners may have asked themselves, "How do I replace a vacuum power cord?!"Fixing a broken or damaged vacuum power cord is another common vacuum repair that do-it-yourself-ers can easily handle at home.Home repairs on vacuums, tools, outdoor equipment, and other appliances can save you a truckload of money at the repair shop, and anyone can take on simple repairs like this one.We explain the general steps for how to replace a vacuum power cord below. Wire connection styles and disassembly steps may vary from vacuum model to vacuum model, but the basic procedure remains the same for all types of vacuums.The disassembly involved in this repair may take a little time, but getting it done at a fraction of the cost is well-worth the investment.

Depending on the vacuum model, this repair can take between 10 and 30 minutes to complete. Remove the Old Vacuum Power CordPower cord replacement is a basic repair for all sorts of machines and tools, and removing the old cord is always the first step.We use the The Hoover U5458-900 WindTunnel Supreme as our demonstration model in this repair. We offer both general repair steps and steps specific to the demonstration model. Step 1: Access the Motor Wires on the VacuumShow All ItemsPower cord wires attach to the vacuum's motor in the interior of the machine. Because the wires must be unattached from the motor in order for the cord to come out, accessing the vacuum's motor is the first step toward cord removal. Accessing a vacuum motor always involves some disassembly. How much disassembly will be determined by the vacuum design being repaired. Inspect your vacuum's power cord fasteners, housings, and other fasteners to determine what will have to come off to access the motor. For vacuums that use agitator brush systems, the cleaner's brush roller and belt must always be removed in order to free up the motor.
On the Hoover U5458-900 WindTunnel:be careful not to just yank the housing off the motorInstead, gently pull the housing up and roll it to one side in order to expose the power cord wires underneath. We’ve all sneakily continued to use damaged phone chargers telling ourselves soothingly that, “oh, one more day won’t do any harm“. Before we know it, we’ve been using that death-trap of a wire for weeks, if not months. But when should we really say goodbye to those damaged phone chargers? Let’s cut to the chase here. In a benevolent ploy we only really want you to read this article for one reason: to throw away those shredded, damaged chargers NOW. Not tomorrow or next week, but today. This dangerously hot, sparking wire is just one of the reasons why: According to an Office of Compliance report; In 2008, electrical fires, electrical failures or malfunctions resulted in an average of 53,600 home fires. These fires caused more than 500 deaths, injured 1,400 people, and accounted for $1.4 billion in property damage.

[Similarly,] the Bureau of Labor Statistics of the U.S. Department of Labor reported that in 2007, private sector workers suffered 1,100 electrical burn injuries and 1,480 electrical shock injuries. These are not very healthy statistics by any standards, and from what we’ve seen, the figures don’t look like they’ve improved much since. Wires can be damaged for a number of reasons. One of the most common causes is when you yank the cable to unplug your phone from the wall socket or the side of your laptop, rather than actually pulling the plug/connector itself.
vacuum cleaner twin motorThis can not only pull the plug from the wire covering, leaving exposed wires dangerously close to where your fingers go, but could even snap the grounding prong on the plug itself.
vacuum cleaner as good as dyson
Sometimes, you might even trap your charging wire in a door, under the leg of your chair, or between the teeth of your dog. This can lead to ‘pinching’ that can result in sliced chords that expose energized wires. This not only puts you at risk of electric shocks but can also lead to short circuits, damaged gadgets, and fires. This may not be your fault at all. Power cables may be strong, but they’re not designed to last forever. Any appliance that receives regular use, whether that’s your iPad or hammer drill, runs the risk of having a damaged cord and exposed wires.
vacuum sewer cleaning truck A power cable- the chord that carries electrical power- is made up of three distinct layers. The outer layer is rubber or plastic that fits snugly around the wires. Next is the colored insulation layer which offers some protection against wear and tear to the innermost layer; the energized copper wires themselves.

As soon as you see damage starting to happen to that outer layer of a power cable, whether that’s pinching, tearing (where you can see the colored wires), or freys, that’s a hint that the inner layers could be damaged, too. This can lead to short circuits (which can damage your appliance) and potential fires. As soon as you see this kind of damage to a wire, temporarily patch it up with electrical tape, and try to get the power chord replaced as soon as possible. If the damage has done harm to to the middle (and likely the energized) layers, however, you need to stop using that power-cable and replace it now. Not only is this extremely dangerous (especially if you have kids or pets around), it’s also a US violation of the National Electrical Code, NFPA 70 in sections 110-2, 110-3 (a) and (b), 110-27 (a), and 250-2 (b)-(d) (Office of Complicance) to use this cable in the workplace. Some people may think this is melodramatic, but unless you’re a qualified electrician, you shouldn’t be relying on your own rudimentary electronic knowledge

Get Started On DIY Electronic Projects with These Learning Sites Building our geeky ideas has never before been so easy. Now is the time to learn DIY electronics, and these are our top recommended resources for doing just that. to patch up or splice a damaged power cable. The risks to yourself, your colleagues, kids, pets, home and appliances just isn’t worth the few dollars it costs to replace the chord in it’s entirety. If other non power-cables are damaged, such as those on your headphones and USB cables (which carry very low voltages), then replacing the wires needn’t be so urgent, though it should be on your to-do list. To temporarily or semi-permanently repair these kind of wires (or replace them completely) with little more than a sharp blade and some electrical tape, follow a good tutorial such as the video below (to be done at your own risk). If you’d rather prevent your cables getting damaged in the first place, there are a few things you can do, including:

Always insert and remove the cable by holding on to the connection, not the cable itself. Once a device is charged, unplug the cable to prevent unnecessary heating of the wire which can lead to damage (extreme hot and cold temperatures damage wires). Carefully roll and store your cables neatly Drowning In Cable Clutter? Cable Storage Tips To Tidy Your HomeDon’t stuff them into bags, pockets, or boxes. Along with this, there are two other neat tricks you should learn to keep those cables ship-shape. We’ve all had to deal with torn phone and headphone cables like this, but a little spring can go a long way to making sure that those wires last longer than usual. You can also use paracord for the same purpose. Who would have thought there was an art to rolling cable? By learning how to do this properly, you’ll help to keep the cables of power tools, vacuum cleaners, and lengthy iPhone and Kindle cables etc in good working order for much longer. When you do get around to replacing those wires you can’t repair, make sure you do so wisely.