vacuum cleaner for attic

Attic cleaning probably isn’t your idea of a good time. But the dust, dander, and mold in that often-neglected room could be irritating your family’s lungs and kicking up allergies. Plus, a clean attic will enable you to put your great into action.“No one thinks about their attic, but it’s a problem area,” says Mike Tringale of the Asthma and Allergy Foundation of America.Attic allergens and irritants constantly seep into your living area through ceiling hatches, doors, recessed lights, and heating and cooling systems (especially if they’re located in your attic).Attic Cleaning BasicsDust walls, window frames, and rafters with an electrostatically charged cloth (think Swiffer) or duster (cost: under $10), which grab twice as much dust as cotton cloths. Don’t forget to dust exposed roof trusses, attic fan blades, light bulbs, fixtures, hatches, and door frames.Vacuum with a HEPA (high-efficiency particulate air) filter vacuum cleaner (cost: $200 to $400), which channels all vacuumed air through a filter designed to remove even microscopic particles.

A less expensive choice: Install a top-quality, high-efficiency filter bag in your vacuum (cost: $8 to $10).Line shop vacuums with a plastic bag, which traps irritants and makes debris disposal easy.Wear a National Institute of Occupational Safety and Health (NIOSH) mask (cost: $13), which filters a high percentage of airborne particles.If you suffer from asthma and allergies — 60 million people in the U.S. do — hire a professional to remove the debris. Prices for pro attic cleaning vary depending on region and nature of the cleanup. Get an estimate before hiring a cleaning contractor.Keeping Irritants Out of Your AtticPreventing mold growth and sealing out insects and vermin helps reduce irritants in your attic.Mold: Small roof leaks and old, cracked caulking can let in moisture, which may lead to mold damage. Once a year, and after each big storm, walk around your home to inspect your roof from all angles. Repair any loose, missing, or broken shingles. Check windows for missing caulking or cracked panes.

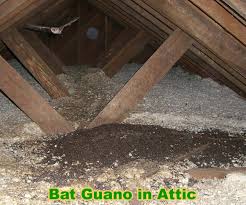
Don’t bother buying a home mold test kit, which may register mold spores that are constantly in the air anyway. If you suspect mold, or can see a mold-covered area that’s larger than about 10 sq. ft., call a certified indoor air quality professional to evaluate your situation.Dust: Many of those tiny dust mites you see floating around are really dust mite particles, roach parts, and vermin dander made of dried saliva, urine, and feces.These dust proteins can trigger allergic reactions, so search for tiny cracks and openings in your roof, walls, and windows where vermin and insects can enter. Seal attic air leaks with caulk and polyurethane foam, and repair any holes in attic ventilation screens that are under the eaves and in gable ends.Related:How To Keep Your House Cleaner Longer Cleaning 101Whether you are removing loose fill attic insulation for replacement with new insulation, changing insulation types, or are removing insulation because of water or wildlife damage, doing it safely is the first step.

The first step in loose fill attic insulation removal is determining what type of insulation you’ll be working with. Use a test kit to determine if the insulation is comprised of asbestos. Older homes and buildings may have this type of insulation installed.
problem with hoover vacuum cleanerIt has a grey paper-like appearance and is extremely harmful to your health.
what is the best upright vacuum cleaner for pet hairIf the test proves positive for asbestos, abort the project and call in a professional service to remove the insulation.
vacuum cleaner price in jaipurDo not do this on your own. It’s important to keep loose insulation in the attic during the removal process.
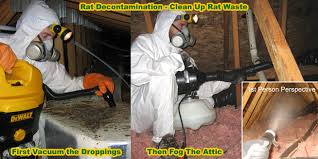
You don’t want pieces of damaged, moldy, or mildewed insulation settling throughout the house. To prevent this, close all of the interior doors. For walkthrough areas, place a sheet of plastic over the opening and secure with tape. To maneuver around the attic safely, lay large planks at least 6 inches wide across the joists. With these in place, you’ll be able to walk around the attic while removing the insulation. Place a large tarp wherever you plan to unload the filled garbage bags. The path leading from the attic to the outside tarp area where you’ll place the garbage bags prior to disposal should be unobstructed. You want to handle the bags as quickly as possible and with minimal interaction, so keep the path clear. If you choose to use a wet-dry vacuum, you’ll need garbage bags to dump the vacuum canister into. After vacuuming all of the loose insulation and emptying it into garbage bags, you’ll want to thoroughly vacuum all of the attic joists. This extra step removes all the tiny pieces of insulation that can infiltrate the air.
When you’re ready to vacuum the joists, start the process at the farthest end and work your way backwards to the attic exit. You don’t want to be stuck in the corner while stirring up the air with old or damaged insulation or dust from dried rodent fecal matter. Even with a dust mask or respirator, keep exposure to insulation at a minimum. Another option for loose insulation removal is to rent a HEPA filtered industrial vacuum. These high-powered vacuums do two jobs. First, the machine sucks up the loose insulation. The second step is the routing of the insulation through the hose and directly into a trash container or large bags located outside. The long hose can be easily placed through an attic window or vent so the majority of the vacuuming process takes place outside. This lessens the exposure and handling of contaminated insulation. An added advantage of an industrial strength vacuum is that the amount of time to complete the removal process takes less time than when using a wet-dry vacuum.