vacuum cleaner cnc
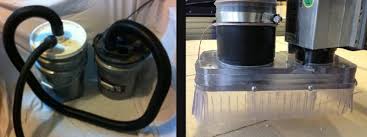
CNC Routers are great. If you’ve ever used one you know this but you also know that they will cover the machine and everything around it with a layer of dust. It is certainly possible to use a shop vac to suck up the dust coming from the router, however, the only problem with that is the shop vac’s filter will clog with dust and lose suction, defeating the intent of your vac system. [Mike Douglas] was ready to step up his CNC game and decided to make his own dust separator. This design is extremely simple and only uses a couple 5 gallon buckets, a few PVC fittings and pieces of wood. To keep the cost down and the style up, the accompanying ‘shop-vac’ is also made from 5 gallon bucket with a vacuum lid. The project is well documented so head over to his site and check out the build process. A dust separator does exactly what its name implies, it separates the dust and debris from the air before entering the vacuum. The following diagram shows how it works: First, a vacuum creates low-pressure inside the dust separator.

That low-pressure draws the dust-filled air into the dust separator.
vacuum cleaner blogspotThe inlet tube directs the incoming air tangent to the circular chamber.
upright pet vacuum cleanerLarge debris falls quickly down past the baffle and into the collection chamber.
electrolux vacuum cleaner motorThe dust enters and is thrown against the walls of the separator as it spins around. While the dust is traveling around the circumference of the separator, gravity pulls it down into the collection chamber. The now much-cleaner air then travels up through the outlet to the vacuum. Now that we have a dust separator doing its job, would you want to stand beside your CNC machine holding the vacuum hose collecting the newly created dust?

Neither did [Gerg], and that is why he made a dust shoe for his ShopBot. It is made from scrap polycarbonate that was kicking around the shop. There are two main components of the design, the top part that attaches to the router and the bottom part that has the skirt. The bottom piece attaches to the top with magnets which allows the skirt to be removed quickly so that the tool bit can be changed easily. And in case you want to make your own dust shoe, [Gerg] has made the dxf files available.Attachment for a KÃÂärcher vacuum cleaner to the 1,5KW spindle of0. The design is PARAMETRIC, so you can change the diameter of your spindle, of the vac hose, the height and the bolt sizes at will. License is CC-BY-NC-SA So you may make one yourself and improve the design but not sell the design or made parts and always give attribution. THIS DESIGN HAS BEEN MOVED TO YOUMAGIN-7 Combine upper and lower parts using long M5x20 or M5x25 bolts. Both upper parst connect using some 3mm filament or an M3x10 bol

t. The tubes are slightly tapered. So you slide them on as until they sit tight. Then secure the assembly on your spindle using an M5x25 nut and bolt. Add glue to make things super secure and sealed if you wantWe'd love to hear from you if the print was successful. If you like the design, please consider donating to the designer.Donate to Marcus WolschonOr share on social mediaIf your browser doesn't download the zip automatically then please click here.Download4FavoriteI printed this designAdd to collectionAttachment for a Kärcher vacuum cleaner to the 1,5KW spindle of a The design is PARAMETRIC, so you can change the diameter of your spindle, of the vac hose, the height and the bolt sizes at will.OtherCreative Commons Attribution Noncommercial Share AlikeCommercial use is not allowed, you must attribute the creator, you may remix this work and the remixed work should be made available under this license.Learn more or download attribution tagsDescription

Simple filter cyclone to do with a CNC milling machine. I built this filter to my CNC machine, dust was collected in an industrial vacuum cleaner which unfortunately fairly quickly filled. The filter is attached to a steel barrel with a capacity of 60l (needed the extra cover - is not in the files). Now the dust and debris getting into the barrel and the vacuum cleaner is clean. We start from the cuting parts from plywood. The gray parts of the file must be offset depending on the diameter of the milling cutter magenta / pink line - a single groove depth of 3-4 mm blue - inside pocket - depth 3-4mm Cut parts are to be joined with screws. The lower part (6-bolt holes) combine with three brackets. Press the bracket in the pocket, set of holes for the screws, put the nut in a wider place in the bracket and screw in the screw. Repeat for all three brackets. For now, do not screw the top. Now PET - our cyclone. After you cut (but before bonding) we must make sure that it will fit into the "case" we made.

Wrap the cyclone and glue it temporarily with tape from the outside. After inserting into the casing adjust shape and mark the end of a line of PET with the marker. Pull out and straighten PET. Glue double-sided adhesive tape on half of PET (the template file marked in a darker color). Now the hardest-remove paper from the tape and glue cyclone. Remember to glue it to the previously marked line. Clamping might be necessary. External joint (that with marked line) glue using hotglue (Becareful not to overheat the PET it might change shape!) Next from PVC pipe cut off about 230mm (part without the cup) and glue the printed template. Carefully, using a Dremel cut off the pipe on the line. We have all the elements we need only connect them. After inserting the PET to the housing, set it (rotate) in such a way that the narrower end of the hole outline was 10mm from the bracket. Check to see if it matches the upper part (the screw can be joined to the test).