vacuum cleaner drive belt keeps breaking

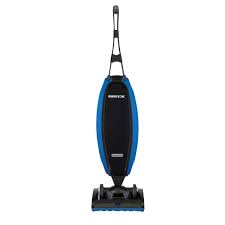
Find maintenance advice and fixes to common issues Magnesium® SP is one of the lightest, full-powered upright vacuum cleaner in America. With its extremely strong, durable magnesium frame, the Magnesium SP packs all the power you expect from an Oreck vacuum cleaner — so much power it feels like it's self-propelled on most surfaces. The two speed Quickswitch® on the back of the vacuum enables you to move smoothly across all floor types using appropriate power levels: high for carpets and low for hardwoods and tile. Additionally, the large high-performance rear wheels with cylindrical wheel bearings give the Magnesium SP maneuverability, making it easy to push through high-pile carpet. Best of all, it lies virtually flat for easy cleaning under furniture. $200 off, Limited Time! The lightest, full-powered upright in America Engineered for the way you live The direct suction and rollerbrush rotating at 7,000 revolutions per minute draw dirt right into the bag.

The brush grooms the nap as it cleans. The Saniseal® system automatically seals shut, locking the dirt in the disposable filter bag. Changing bags is effortless. Magnesium SP Vacuum Cleaner lies virtually flat, has a wide cleaning path and a 30 ft. cord, making it easy to cover a lot of ground, quickly get in and out of tight spots and get up and down stairs. Magnesium SP Vacuum Cleaner uses a HEPA inner bag. As air passes through the HEPA inner bag, it captures at least 99.97% of particles as small as .3 microns from that air, such as pollen, dust, smoke, animal dander and mold spores. The new 'Easy Snap' cord clip is the smart way to keep the cord where you need it ... not where you don't. The Oreck Magnesium SP Vacuum Cleaner has received the Gold Seal of Approval from the Carpet and Rug Institute, the leading U.S. carpet authority, which certifies that it meets the highest performance standards. How to Change a Bag Need to change the bag on your upright vacuum cleaner?

See easy, step-by-step instructions with photos here. How to Change a Belt Did you know that you can change the belt on your upright vacuum cleaner yourself? We'll walk you through it, with photos and easy-to-follow instructions right here! Lightest Oreck upright vacuum cleaner ever Weighs less than 8 pounds Magnesium SP vacuum frame is stronger than many types of steel High performance motor spins pile-lifting rollerbrush at approximately 7,000 RPM
vacuum cleaner motor faults Larger wheels for superb maneuverability
vacuum cleaner repair reading pa HEPA inner vacuum bag included
12v vacuum cleaner motor Saniseal bag disposal system Comes with a 7-year limited warranty** and 3 yearly tune-ups
The Oreck Advantage: Direct Suction Our direct suction design delivers dirt in a straight, efficient path right to the vacuum bag. It's a streamlined design that works beautifully with a smaller motor — and one reason why Oreck bagged uprights are so lightweight. Here's how: our upright vacuums incorporate a "dirty air system" in which dirt is pulled through a fan that breaks it into smaller particles that get sucked up into the vacuum. Oreck's smaller motor drives this fan, as well as the brushroll. Because these smaller motors sit closer to the floor they provide efficient suction and are able to spin the brushroll incredibly fast. *Approximate weight without cord How to Replace a Dryer Drive Belt The dryer drive belt transfers rotation from the drive motor to the dryer drum. If the drive belt breaks, the motor runs but the drum won't move. Before ordering a replacement dryer drive belt, unplug the dryer, lift the top, and physically check the belt to verify that it's broken.
If the belt is broken or damaged, follow the steps in this dryer repair guide to replace it with a manufacturer-approved replacement part. Less than 90 min. For manuals, repair guides, and specific part recommendations, enter your model number. Help me find my model number Wear work gloves to protect your hands. Warning: Undertaking repairs to appliances can be hazardous. Use the proper tools and safety equipment noted in the guide and follow all instructions. Do not proceed until you are confident that you understand all of the steps and are capable of completing the repair. Some repairs should only be performed by a qualified technician.If it's a gas dryer, shut off the gas. Pull the lint screen out of the housing in the top panel of the dryer. Use a Phillips screwdriver to remove the 2 screws that secure the lint screen housing to the top panel. To release the clips that lock the top of the dryer in place, push a putty knife under the lid near the left and right edges of the front of the dryer.
Lift the top and prop it securely against the wall behind the dryer. Use a slot screwdriver to release the locking tab on the wire harness plug for the door switch. Disconnect the wire harness. Use a 5/16" nut driver to remove the front panel mounting screws from the inside of the cabinet. Pull the front panel forward slightly, and then lift and unhook it from the 2 bottom hangers. Pull the front panel off of the dryer and set it aside. Pull the broken belt out of the cabinet. Position the new drive belt on the dryer drum. Lift the front of the drum to access the drive motor and idler pulley. Thread the drive belt through the idler pulley. Push the idler pulley to the right and loop the drive belt over the motor pulley. Tip: While the cabinet is open, vacuum the dust and lint from inside the dryer cabinet. Position the front panel on the hangers at the bottom of the cabinet. Line up the mounting holes and reinstall the screws in the top of the front panel to secure it to the dryer cabinet.